
The return to campus has ushered in new ways of teaching for many at Sydney; one of these is optimistically referred to as “HyFlex”. Although HyFlex has been around for at least a decade, it has received renewed attention during COVID-normal teaching because it typically involves classes where students are simultaneously face-to-face and online. In the Sydney context, this typically means you have a class with on-campus (‘CC’ for Camperdown campus) and remote (‘RE’) students.
Despite its advantages for students especially during a pandemic, HyFlex is not without its challenges and takes considerable planning, orchestration and frequent troubleshooting. In this article, we follow up on a previous article about mixed-mode teaching to address some key considerations for the running of HyFlex classes, and discuss approaches for structuring HyFlex sessions. We also offer some resources on equipment set-up and troubleshooting.
Running a HyFlex class
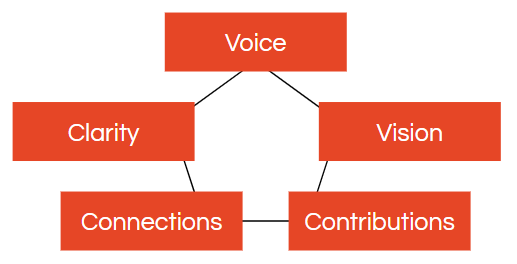
The success of a HyFlex class is its ability to engage students both present in the classroom as well as online, with both groups being able to achieve the learning outcomes the class aims to address. The five points below can be used as a checklist to consider how to best run class activities. These are: voice, vision, clarity, connections, and contributions.
Voice
Can everyone hear each other? Does everyone know how to verbally enter the discussion? We’ve all been in Zoom meetings where terrible audio has detracted from everyone’s understanding. In a HyFlex class, audio is even more important. A common barrier is not knowing how to best join the discussion – what can Zoomers do to indicate that they wish to speak? Make it clear how you would like them to communicate (e.g. hands up in Zoom and wait for you to ask them to unmute their microphone) and ensure they feel equally welcome to do so. A common technical issue is that on-campus students are not audible on Zoom unless they are speaking directly into a microphone. Foster etiquette in your on-campus students that they need to speak into a microphone if providing verbal contributions to the whole class. For very short student input that is not picked up in a microphone (e.g. a quick question), for efficiency you may choose to just repeat it for the Zoomers.
Vision
Can everyone see each other? Can the Zoomers see you (the teacher)? Can you see your Zoomers’ videos, raised hands, and chat contributions? We are all used to teaching to black rectangles on Zoom; when students are simultaneously remote and on-campus, we need to work extra hard to build a connection between both groups. Often, seeing each others’ faces and reactions is a good start. Typically the best way to do this is to use two devices in a room (e.g. the lectern computer and your own device)
to ensure that Zoomers stay visible. If your teaching venue supports ‘dual projection’ (i.e. two projection screens), it’s even possible to set it up so that one screen is dedicated to showing Zoomers’ video feeds and chat – see option 1C in our HyFlex setup guide.
Clarity
Is it clear for both groups of students how they can complete class activities? To keep the momentum of a live class, it’s important that both remote and on-campus students know what’s happening and what they should be doing. In 2020, we all developed expertise in being clearer to all students because we were all on Zoom – when to use chat, when to raise hands, when to unmute microphones, where to post contributions. When teaching HyFlex, we often fall back to face-to-face mode and give clear guidance to on-campus students while Zoomers languish in uncertainty. Being clear about how you want students to access resources or shared documents, how long you want them to spend on each activity, and what you will do at the end of the activity (e.g. get one person to share, collate responses etc) can help to set the expectations for both groups. As much as possible, run the activity the same way for on-campus and remote students – see our tips below around contributions and designing for ‘online first’.
Connections
During HyFlex learning, it is very easy for students to feel disconnected from teachers and peers, even those who share the same virtual or physical space. One approach to supporting connections is to use one of the projector screens to show the Zoom video feed and chat, so that Zoomers can be continually visible to on-campus students and yourself (option 1C in our HyFlex setup guide). For some group activities, you may want to consider creating breakout rooms with a mix of remote and on-campus students; on-campus students will also need to be logged into Zoom, and bring earphones. This works better if your teaching venue has sufficient space for on-campus students to spread out while in these mixed-mode breakout rooms.

When teaching a HyFlex class, we have found that we feel most connected to Zoomers if we can see them and be able to turn to face them. We typically do this by having a second device (e.g. a laptop with a built-in webcam) that sits on the lectern and is also connected to the Zoom meeting. This second device has the Zoom video feeds and chat box, so that we can see the Zoomers and can very intentionally look at them through the laptop’s webcam and be seen to be speaking to them directly.
Contributions
During 2020, many educators flocked to online tools such as Padlet, Google Docs, Google Jamboard, Miro, MindMeister, Mentimeter, and even the humble Zoom chat and Zoom whiteboard. The common element amongst this plethora of tools is a shared (online) space to collect student thoughts and contributions, usually synchronously (live). These tools had significant benefits when everyone was learning and teaching online in substituting for flipcharts, post-its, and whiteboards that were used in face-to-face teaching. When teaching in HyFlex, student contributions need to be more carefully orchestrated. Who is writing where, when? Are both remote and on-campus students adding ideas and comments into the same space? Can both groups of students access the activities equally?
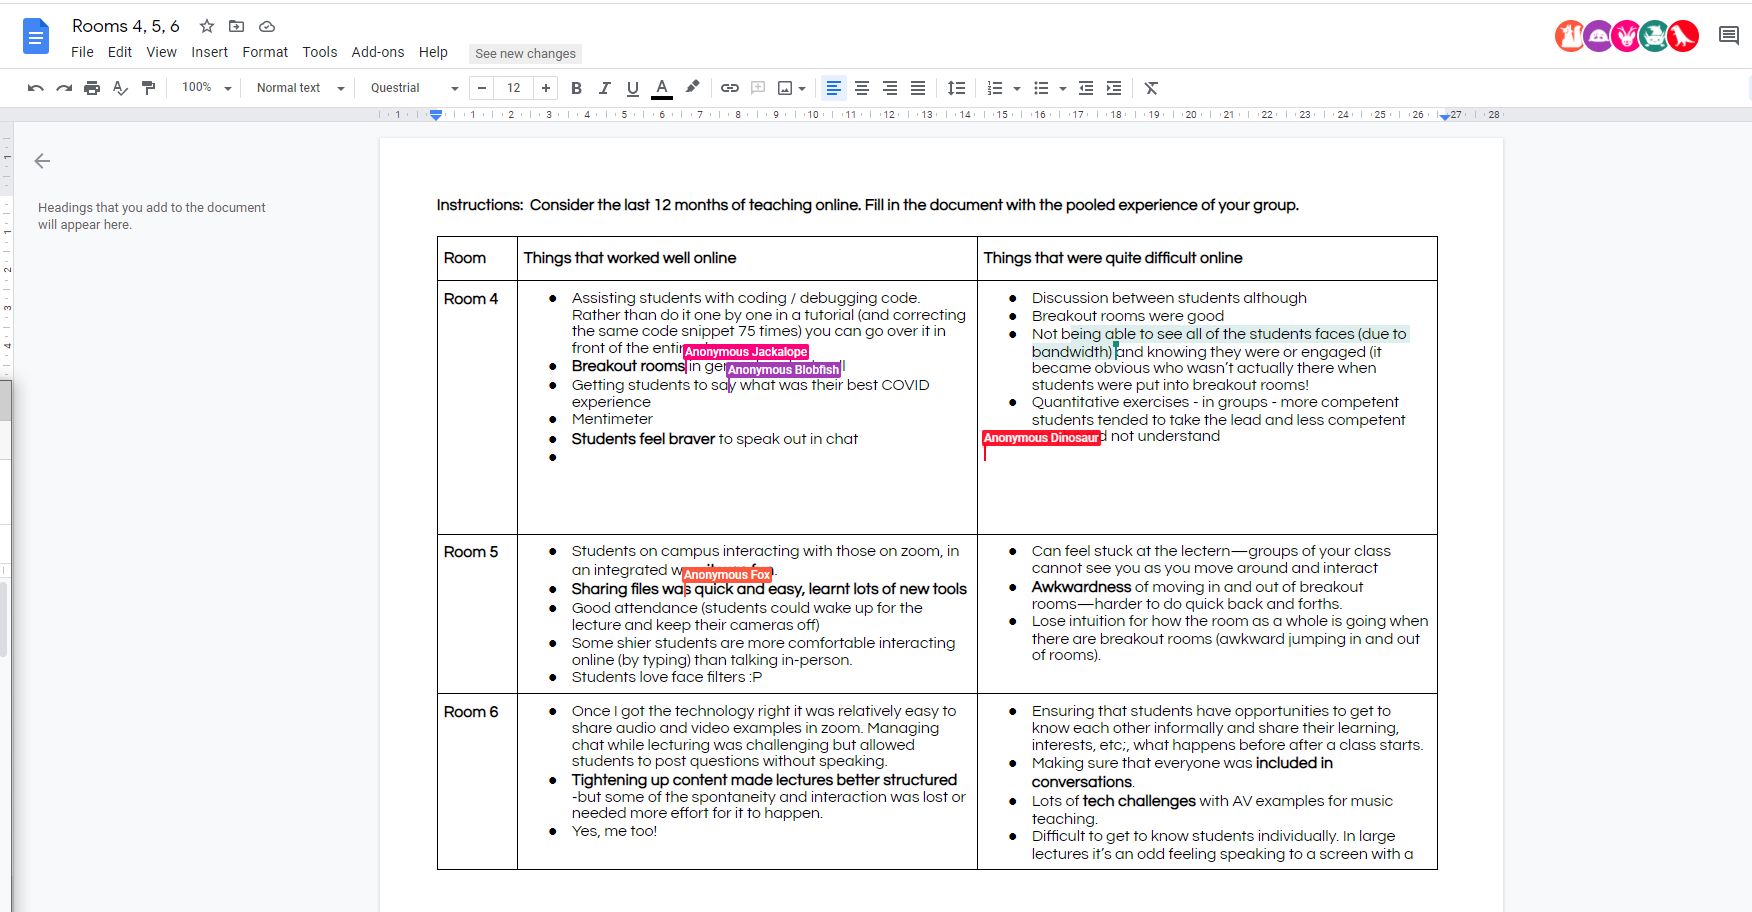
Using a single online space to gather student contributions, similar to how we taught fully online in 2020, can help to keep instructions simple for students and reduce their cognitive load (and ours!). The single online space also helps us to monitor student contributions more easily. Some of the technologies we have found particularly helpful have included Padlet (which allows students to anonymously and quickly share short written content, photos of their work or even links to files). Also, the Google or Office365 suite have also been helpful in creating online spaces that allow students to contribute ideas (e.g. documents with pre-filled prompts for students to complete [see screenshot at right], spreadsheets for students to contribute data, slide decks for students to contribute ideas or explanations). As the teacher, it is really helpful to be able to see students working in real-time and stay digitally present with them even as they work in the isolated spaces of Zoom breakout rooms. Having remote and on-campus students contribute to the same shared online space also helps to build connectivity between the groups.
Designing the structure of a HyFlex class
It’s also important to consider how the format of the activities within a class could be structured to make the most of you and your students’ time and physical/virtual locations. We have come across three main approaches to structuring a HyFlex class session.

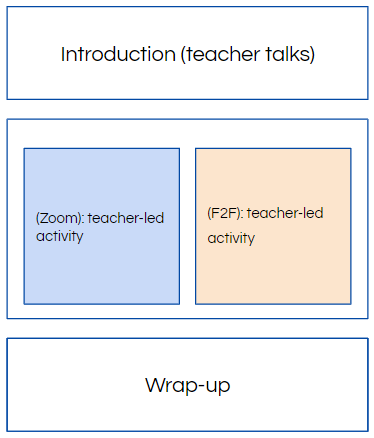
The first approach involves remote and on-campus students largely working as independent groups. While activities run, you (the teacher) dedicate your attention to one group at a time, while the other group works independently. For example, you may design an independent or group activity that does not require teacher input, such as curating media reports on a topical issue. This independent activity (i.e. not teacher-assisted) may be completed by the Zoomers while you actively lead a different activity with the on-campus students (e.g. a facilitated discussion on fake news). Halfway through the class session, you swap and the Zoomers have your undivided attention for the facilitated discussion, while the on-campus students work on the independent activity. This has the benefit of reducing your own cognitive load (needing to only work with one group at a time) and giving each group your full attention. However, it would be more difficult to build a sense of student-student connection between remote and on-campus students.
The second approach involves running the same activities at the same time for both remote and on-campus students, but the two groups of students contribute to separate spaces. For example, you may run an activity to brainstorm approaches to inviting public opinion on mask wearing. On-campus students work in on-campus groups around physical tables and chairs and flipcharts, whereas remote students work in Zoom breakout rooms and fill in their ideas into a Google Doc or online mindmap. This approach has the benefit of keeping all students at the same stage (which may aid the sharing of generated ideas), although there are still challenges in connectivity between the groups. There may be some technical challenges around sharing the contributions between the remote and on-campus students as well, since they are working in different spaces.

The third approach involves intentionally mixing the remote and on-campus students during class activities. As part of this third approach, it’s important to have a shared online space where both on-campus and remote students can contribute ideas to – this enhances connectivity between the groups because their contributions are seen together. You might also consider forming form ‘mixed-mode’ breakout rooms in Zoom; this requires on-campus students to be connected to Zoom on their own devices (and using earphones/headphones), and you creating breakout rooms that each have a mix of remote and on-campus students (asking students to rename themselves in Zoom and appending a ‘F2F’ or ‘Zoom’ to their name helps here). Mixed-mode breakout rooms can be challenging (they take a bit of time to set up, the background noise of talk in the room can get distracting for Zoomers), but it builds good connectivity between the groups.
You don’t need to go all out and make mixed-mode breakout rooms though – the main consideration with the third approach to HyFlex structure is to ensure that remote and on-campus students are sharing and contributing to the same space. For example, on-campus and remote student groups might work separately to each other during group discussions, but all students might contribute ideas to the same shared online space (e.g. Padlet, Google Docs, etc). After the group activity, you’d then structure and run the whole-class discussion to overtly include the voices of both remote and on-campus students, such as by deliberate turn-taking.
Our general tips for teaching in HyFlex
- Design for ‘online first’ – as much as possible, design activities that can be completed fully online. This is the shared space between remote and on-campus students, and important so that remote students do not feel second-class. On-campus students can use their own or their peers’ devices to contribute to activities online. Designing for online first also makes ‘instructional continuity’ easier –
this is a somewhat clinical but accurate term which means that teaching can continue in the face of unexpected events such as local lockdowns or catastrophic weather. - Keep it simple – giving instructions for two separate groups of students can be both challenging and time-consuming. If you can keep the activity design simple, this will help reduce the time and cognitive load it takes to set up and explain who should be doing what, where, and how.
- Limit your transitions – it takes a few minutes to completely transition between one activity and another (e.g. from a segment where you ‘lecture’ to the next segment where there is a student-paced activity). Reducing the number of different activities or segments will help to reduce the time and cognitive load it takes to move your students (and you) between them. If possible, stick to the same format of the activity even if you tweak or alter the focus halfway (e.g. a Padlet activity on gathering student opinions, followed by a short interlude and then another Padlet activity where students comment on pre-prepared stimulus).
- Allow for more time – everything in HyFlex takes longer, so allow extra time for setting up your teaching space (connecting Zoom, opening files, etc), setting up activities, managing questions from Zoomers and your on-campus students, etc.
- Don’t forget one group – it is so easy when teaching HyFlex to get sucked into one space, either focusing on the remote students as you manage Zoom, or the students in class as you naturally connect with students only a few feet away. Give yourself visual cues to help you remember to pivot between both groups, such as placing a laptop on the lectern with the Zoom video feeds, or making a note every few slides in your slidedeck to check on Zoom chat.
- Invite your students to help – managing HyFlex on your own is a significant challenge. Usually, HyFlex is most successful when there is a second teacher. In the absence of this, try to ease your own cognitive load by asking a couple of on-campus students to be ‘Zoom advocates’ who help you monitor Zoom chat and raise relevant questions verbally, briefly summarise questions/contributions that are not audible to Zoom, remind you or other students to use the microphone, etc.
- Set student expectations – HyFlex is fairly new to most of us, and our students too. It’s important to set clear expectations about student behaviour and what remote and on-campus students will experience. Often a slide at the beginning of each lesson helps to remind everyone of these. Our HyFlex setup guide has some ideas, in the section on managing the room and student expectations.
Tell me more!
- Check out the HyFlex setup guide, an illustrated step-by-step guide on teaching in HyFlex using University of Sydney venues.
- We’ve developed a short HyFlex troubleshooting guide as well, focused on technical issues that might arise such as audio problems.
- Sydney educators can book in for a HyFlex Clinic for hands-on practice with the technology available in teaching spaces, and consider modifications to teaching activities for HyFlex delivery.
- Discover some more ideas about designing active learning activities for an ‘online first’ approach.