With large class teaching going ahead in the online format some of us are considering Zoom ‘webinars’ as the tool of choice for live sessions.
After all, it can support large (and very large) groups of people coming together at the same time if not in the same space.
Webinars can be a tricky space to teach in as they can sometimes make us feel a long way away from our students but, much like looking across the still surface of a creek, we know there is much activity below the surface and we just need to take special care to look and connect. Last year we shared some of our colleagues’ experiences in ‘feeling the room‘ when teaching in the Zoom online space. In this article, we share some of the nuances of the Zoom Webinar and how you can continue using some of your skills, tricks and approaches to keep your students engaged and help you feel connected with all the activities happening below the surface.
Wait, what do you even mean by “Zoom Webinars”?
Zoom the video communications tool supports two slightly different platforms, the “Zoom Meetings” (which we have been using for teaching) and “Zoom Webinars”.
The Zoom meeting platform is designed to allow collaboration between the host (teacher, chair etc.) of the meeting and the participants (students, delegates etc.). This is the Zoom interface that you have most likely to have come across and the one we have used for teaching in the online context in almost all settings.
Zoom webinars are designed to facilitate a much larger group of people coming together.
Here, we consider some of the affordances of Zoom webinars that have been designed to allow communication with your large group of students.
How large is large and when should I use a Webinar?
Zoom has a complex set of licenses that regulate how many individuals can join a meeting. Here is a quick summary of the capacity of the different kinds of Zoom licenses and how to go about requesting access to a license with a larger capacity.
| Name of the license | Number of concurrent users | Which license do you need? |
| Zoom meeting | 300 | Default license you have with your university account. |
| Zoom large group meeting |
500 | You can request a large group meeting through ServiceNow form |
| Zoom very large group meeting ** | 1000 | If your class enrollments are above 500 we suggest getting in touch to upgrade your license to the most suitable option. |
| Zoom webinar ** | 1000 | If your class enrollments are above 500 we suggest getting in touch to upgrade your license to the most suitable option. |
| Zoom large group webinar ** | 3000 | If your class enrollments are above 1000 we suggest getting in touch to upgrade your license to the most suitable option. |
** The university has a limited number of licenses available and is a shared resource. If you need access to these licenses for teaching large units they can be allocated for you on request.
What is so special about a Webinar?
You’ve probably already attended a webinar (for example, at the University Town Halls) so have noticed that the most obvious difference between Zoom meetings and Zoom webinars is that the participants of a webinar join in a “listen-only mode” this means that they do not have permission or indeed the ability to turn on their microphones or their cameras unless explicitly invited to do so by the presenting host. While this means no black boxes, it unfortunately also means little to no immediate visibility of your students other than their list of names displayed on the participant window.
If you are worried about how to engage this potentially silent audience, bear with us as we share some ideas below on how to engage and stay connected.
The second striking difference is the language, or rather the labels, used by the Zoom webinar.
The hosts are called “panellists” and the participants are the “attendees”.
Just when we finally start to get a feel for host, co-host, and alternative hosts – luckily this is really where the difference starts and ends and Zoom runs out of categorizing and labelling people in interesting and creative ways. If you think of it in terms of how you have run meetings with Host and Co-host then both of you will be now panellists and as panellists will have the ability to enable your video and audio, share your screen, and promote others so they too can speak.
The third significant difference is the absence of breakout rooms in Zoom Webinars as this function is not supported.
How to better ‘feel the room’ when remote teaching – the webinar edition
In a previous T@S article we have considered the question of how we can stay connected to our students when teaching online, staying connected to the level of engagement within our student groups.
With the barrier between teacher and students even more tangible on a Webinar, what tools do we have at our disposal to continue “feeling the room”?
1. QnA
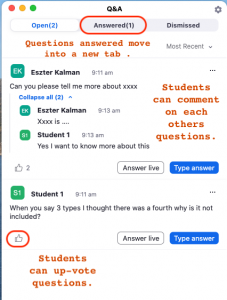
Zoom webinars have a unique tool, called the “QnA”, it is essentially a “chat” tool but with some nice bells and whistles which helps large groups of students communicate in typed text.
For example, the QnA tool in Zoom webinars allows students to ask questions, the teacher to track and respond to these questions and mark them complete.
No more scrolling through the long chat transcript searching for questions interspersed with student chatter.
Your students also have some nice tools at their disposal, they can, for example, post their questions anonymously, up-vote other questions already posted or comment on each others’ questions.
2. Chat, but different
In addition to the QnA tool, students can also type into a chat box that
closely resembles the one we are used to seeing in a Zoom meeting. There are some minor differences that are helpful to be aware of, for example, the chatbox will allow students to send messages to the whole group or just to the panellist but does not allow students to send private messages to each other.
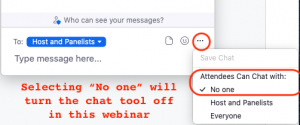
Sometimes having the chatbox as well as the QnA box can be confusing to your attendees/students as they don’t know which tool to pop their questions into so you may wish to disable the chatbox and direct all questions into the more powerful QnA tool.
3. But what if one of your students would like to be able to speak?
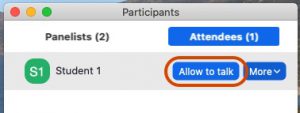
Webinars will allow your attendees/students to “raise hand” and indicate that they would like to be able to speak. Much like in a Zoom meeting the individual with a raised hand will be listed at the top of the list of participants (assuming the participant pop up box is open). In a webinar meeting hovering over the name of the attendee with a raised hand will give you the option to “Allow to talk”, once clicked the attendee will join the panellist, become visible and be given permission to unmute and or enable their videos.
4.
Third-party tools
Student response systems, polling tools, or clickers are especially helpful in Webinars as it allows us the teachers some ‘visibility’ of our students, providing students with a chance for engagement and opportunities to put into practice the ideas of the teaching session.
Much like in a Zoom meeting, sharing the link to participate in the chatbox and sharing the screen with the results will encourage participation by most of those attending. With the Webinar format making student to student and student to teacher connections challenging, these tools are a crucial addition to our teaching toolkits providing a portal between the visible panellist-teachers and the silent student-attendees.
Practice mode
Perhaps one of our favourite options available when running a webinar is the “practise mode”. Think of this as your behind the stage, practice space where you can talk with other panellists, try sharing your screen or make sure microphones are on and working without the audience seeing any of these important though sometimes nervous preparations. If the ‘practice mode’ is enabled when the webinar is set up all panellists will be automatically allowed “backstage” while the attendees will be asked to wait for the start of the session. When ready, the panellists can select the “Start Webinar” button and much like the raising of the curtains the panellists and shared screen become visible to everyone in the webinar.
What tools are unavailable in a Webinar?
There are a few favourites from Zoom meetings that you will see as absent in the webinar mode. These are presumably disabled to keep a large group of people from being able to disrupt a meeting or purely because the organization of large groups would become infeasible. You will find the following absent on a Zoom webinar:
- Reactions – those emoji-like buttons or thumbs up or thumbs down signs are unavailable to participants. They can use the “raise hand” button but there are no other reactions available.
- Annotations – students are not able to annotate the shared screen or a shared whiteboard. We assume the Zoom developers considered hundreds of people annotating at the same time just too chaotic to be a good idea. The panellist (the teacher) sharing the screen can still use the annotations if they wish to.
- Breakout rooms – Zoom webinars do not have breakout rooms as an option
- Private messaging – indeed (students) do not have the ability to send private messages between each other. As noted in the section above, the attendees have permission to message the whole group or the panel directly, there is no option to chat with other individuals (i.e. other students).
Tell me about the nitty-gritty!
We are ever busy building Knowledge Base articles to help you with the “how-to” of eLearning.
Please visit the Education Innovation Team’s Knowledge Base articles to find some guides on “How to schedule a webinar for teaching?” or “How to add your Zoom recordings to Canvas” as well as many others.