A new do-it-yourself recording booth is now available for any University of Sydney staff member to book and use to record high-quality educational videos. With Sydney’s move to more blended and flipped learning, this DIY booth will provide the equipment you need to make engaging videos to deliver concepts that face-to-face classes can then build upon. Read on to find out how you can make impactful educational videos and how to get access to this space.
What makes a good educational video?
Slidedeck with voiceover.
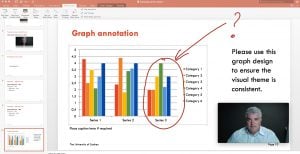
A screencast with narration over PowerPoint slides and on-screen annotation
A ‘pencast’ over a software demonstration
High-end documentary style videos are usually not needed for good educational video – so spend your time focusing on the content and how you deliver it. Students appreciate and often learn better from a raw, ‘cheap-and-cheerful’ video made by their teacher. Here are some quick guidelines, which are distilled from our draft guide on making educational videos (PDF download).
- Ideal content includes core concepts that change infrequently (so you don’t need to re-create content continuously) and content that students find challenging and tedious (so they can review at their own pace).
- Shorter videos are more engaging, and easier to re-make if necessary. But don’t just splice an existing lecture recording into 5 minute chunks – create videos especially with the format in mind.
- Low-fidelity videos engender a more engaging, personal feel. Splicing or including your smiling, talking face into your video helps to engage students. Try filming in an informal setting (your office, if it’s quiet, is sufficiently informal).
- Good quality audio is paramount.
- Preparation and planning are important – having a script (or at least some talking points) has many benefits, including (i) helping to structure your video, (ii) calming your nerves, (iii) reducing mistakes and editing time, and (iv) providing text that can be used for accessibility purposes or providing closed captions.
The equipment available in the DIY recording booth will help you to create videos like these, and more!
What’s in the booth?

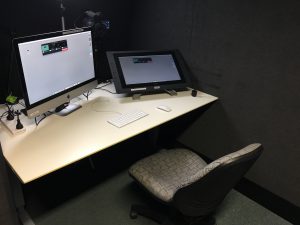
The DIY recording booth has:
- iMac equipped with Camtasia (easy-to-use software to record the screen), Microsoft Office and Keynote (to show slidedecks), and screen annotation software (to draw over the screen)
- Wacom Cintiq tablet with pen (to draw over the screen with great precision)
- Professional-quality microphone and camera (these are connected to the iMac)
- Soft lighting
- A comfortable chair (great since you’ll never want to leave)
How do I get access and book some time in the booth?

The DIY recording booth is room 206 of the Education Building A35 (location details). Access can be granted to any University of Sydney staff member during business hours (9 am to 5 pm weekdays) via swipe card. To gain access and book time:
- Register to attend a familiarisation session here. These one hour sessions usually run once a week at the venue and are limited to eight people. Once you have completed a familiarisation session, you will be given swipe card access within a week. If you have any difficulties, contact the booth administrator account directly.
- After you have attended a familiarisation session and have swipe card access enabled, you are free to book the DIY recording booth in 1-2 hour slots. To do this, view the shared Outlook calendar for the booth, called “DIY Recording Booth” ([email protected]) and book sending a meeting request to this account. PLEASE ADD YOUR NAME IN THE SUBJECT FIELD. See how to view a shared calendar for PC or Mac.
- An administrator will respond by confirming your booking request.
The DIY recording booth operates under a do-it-yourself model – this means that we want staff to be empowered to make videos themselves, and minimal support is provided beyond initial familiarisation with the equipment. We highly recommend the training resources available on Lynda.com for tools such as Camtasia and the Wacom tablet. The University of Sydney has an institutional subscription to Lynda.com – just type ‘sydney.edu.au’ into the institutional portal login page.
Tell me more!
Check out some other allied resources on educational videos:


